Note that you will have to reinstall all of your programs that are not on Ubuntu out of box, but once the programs are installed, they will remember your preferences from before because they were stored on home. For example, I had to reinstall Chrome with my new 10.04 but once it was installed it remembered all of my passwords from before.
Setting Up Root and Home
*I recommend backing up your files before following this guide.
Install Ubuntu as normal, but when you get to the partition wizard, choose to specify partitions manually (advanced).
The next screen will allow you to specify partitions. If you are installing on a clean hard drive, you should see your hard drive (dev/sda) and under it "free space". If you have a pre-existing install on your hard drive you may see something like "sda1". If you have all of your files backed up, you may right click on sda1 and delete it. When you delete it, you should now see "free space". Now right-click on "free space" and click on add.
Now we are going to add your root partition. Root should be "Primary" partition type. Choose the size accordingly. My root drive is 4 GB, leaving about 10 GB for home. Be sure to put your size in megabytes. 1024 megabytes equals 1 gigabyte. Set the location as "beginning". I use Ext4 journaling system, which is pretty much standard. redDEAD over at ubuntumini.com gives a succinct explanation the different types of journaling systems.
The file system selection is up to you, Ext4 is recommended and the fastest. Other users prefer Ext3 for its rock solid stability or Ext2 because it does not journal. Journaling protects against data corruption in the case of a power failure or system crash but it also writes more frequently to the solid state disk. Most users will want to Use Ext4, it is Ubuntu's default section.The mount point is simply a forward slash, which designates this as root. Before you hit OK, make sure your setup looks like the following screen.
Now we will set up the home partition. You'll notice that the root you just sat up is now listed with "free space" under it. Right-click on "free space" and click "add".
Now this one is going to be logical instead of primary. If you are not doing a dual boot, go ahead and use up the default amount of space the wizard gives you. If you are doing a dual boot, go ahead and figure up how much space you want to be available for any other OS you may install and enter the difference here. Also, if you have less than a gig of ram, you may want to leave some space for a SWAP partition as well.
The location, again, is "beginning." We will use an Ext4 filesystem unless you want otherwise. The mount point is "/home". Your setup should look similar to this:
Now your root and home partitions are set up and the prepare partitions screen should look similar to the screen below.
Now just click "forward" and let the installation continue. If you get a message about adding space for SWAP, just ignore it unless your computer has very little ram.
Now you are prepared to have a stable home directory, even if you are regularly formatting and reinstalling Ubuntu. Now lets cover what to do when you do reinstall Ubuntu on root.
Getting a New Ubuntu Installation To Recognize Your Home Drive
*I recommend backing up your files before following this guide.
Now we have to make sure that Ubuntu will recognize your Home partition as its home sweet home when when its freshly installed. The first time I reinstalled Ubuntu, the Home directory was only recognized as an unmounted, foreign filesystem. To avoid that simply follow these few steps.
Go through the install process like normal until you get to the screen where you set up your partitions. Choose "specify partitions manually (advanced)".
Now you will see two partitions already there. You want to choose the root partition. Most likely, you will be able to tell which one is root by the size. Your root should be significantly smaller than home unless you are using a small SSD. If you are still unsure, you can boot to Ubuntu and use the disk manager or system monitor to look at your drive name (sda1, sda5, etc). Right-click on the root partition and select "change".
On this screen you can leave the size the same. Leave the file system as Ext4. Put a check in the box beside "format". Finally, assign the mount point as "/" as seen in the screen below.
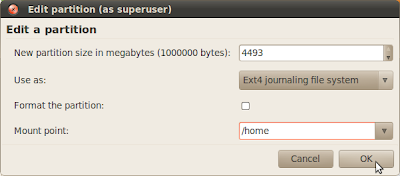
So far, we have set it up so you will get a new installation of Ubuntu. However, you want to keep your existing home directory. To do so, right-click the other partition, which should be home, and select "change". Leave the size the same. Keep it as Ext4. DO NOT put a check mark beside "format". Doing so will wipe it out. Now assign the mount point as "/home". Assigning this as the mount point ensures that your new installation will use this partition for Home.
Now you are ready to finish the installation and use Ubuntu with all of your existing files and preferences. Your partitions should look like the picture below. Again, make extra sure that the Root has a check mark under "format" and that Home DOES NOT have a check mark.


No comments:
Post a Comment